# Tripo Plugins
Use Tripo directly inside the tools where you already create 3D content. Choose the plugin for your workflow, download it, connect a Tripo API key, and generate models without leaving your editor.
## Supported plugins
| Plugin | Tripo version | Compatible version | Best for | Download |
| ------------- | ------------- | ------------------ | ------------------------------------------- | --------------------------------------------------------------------------------------------------------------------------------- |
| Unity | `1.0.1` | `Unity 2022+` | Generating and importing game assets | Download |
| Unreal Engine | `1.0` | `5.6.0` | Editor and Blueprint workflows | Download |
| Blender | `0.7.3` | `3.0+` | Generating a base model for further editing | Download |
| Godot | `0.02` | `4.4+` | Editor and `Node3D` workflows | Download |
| Cocos Creator | `1.0.0` | `3.8.6+` | Creating assets inside a Cocos project | Download |
| ComfyUI | `1.1.21` | `0.3.14` | Node-based 3D generation workflows | Download |
Each plugin exposes a different subset of Tripo features. The examples below describe only behavior present in the corresponding package.
## Plugin use cases
### Unity — Generate a game prop
**Use case.** Create a placeholder or production starting point while prototyping a scene.
**Steps.**
1. Open `Tools > Tripo API Unity` and configure your API key.
2. Select **Image to Model**, upload an image, and start generation.
3. Wait for the task to finish and let the plugin import the downloaded model into the project.
For an optional local **Text to Model** runtime workflow, the package also exposes `TripoRuntimeCore`:
```csharp
GetComponent()
.SetAPIKey("")
.SetTextPrompt("a stylized wooden treasure chest")
.TextToModel();
```
**Result.** The generated asset is available in Unity for material setup, scene placement, or further editing.
Download
### Unreal Engine — Generate through Blueprint
**Use case.** Add model generation to an Unreal editor tool or Blueprint-driven prototype.
**Steps.**
1. Create a text, image, or multiview generation task with the plugin's Blueprint nodes.
2. Use the callback and task-status nodes to wait for completion.
3. Pass the returned model URL to the download node. Runtime display requires the separate glTFRuntime plugin documented by the package.
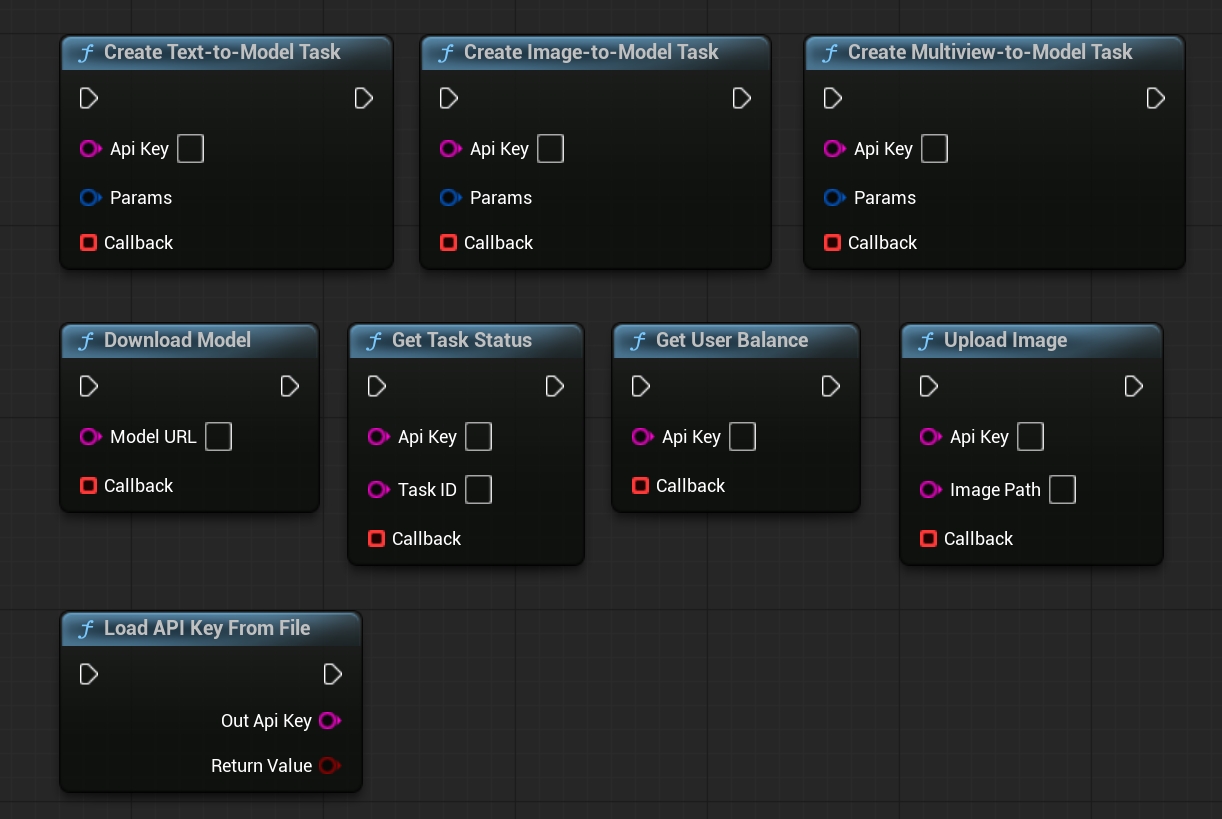
**Result.** The generated model can be downloaded for editor import or passed to a runtime display workflow.
Download
### Blender — Generate from a reference image
**Use case.** Produce a base mesh from an image, then continue modeling and material work in Blender.
**Steps.**
1. Open `View3D > Sidebar > Tripo 3D` and connect your API key.
2. Choose image-to-model, provide the reference image, and adjust options such as face limit, texture, PBR, or quad mesh.
3. Start generation and wait for the plugin to download and import the result.
**Result.** The GLB or FBX is imported into Blender and can be edited with the standard modeling tools.
Download
### Godot — Add a generated model as Node3D
**Use case.** Generate a 3D object in a Godot editor or local runtime workflow and add it to the scene tree.
**Steps.** Configure the API key in the plugin, create an input and task node, then wait for the task to finish:
The example below uses a text task. For an image task, upload the source with `TripoUploadImage` and create the model with `TripoImageToModel`.
```gdscript
var input = TripoTextToModelInput.new()
input.prompt = "a stylized wooden treasure chest"
var task = TripoTextToModel.new()
task.input = input
add_child(task)
if await task.launch() == TripoTask.TaskError.eSuccess:
add_child(task.save_to_node())
```
**Result.** The generated model can be previewed, saved, or added to the current scene as `Node3D`.
Download
### Cocos Creator — Save a generated project asset
**Use case.** Create a model from text or an image without leaving Cocos Creator.
**Steps.**
1. Open the **Tripo Model Generator** panel and connect your API key.
2. Select text or image input, configure generation options, and start the task.
3. Wait for the extension to download the finished model into the project.
**Result.** The GLB or FBX is written under `assets/resources` and can be used by the current project.
Download
### ComfyUI — Build a text-to-3D workflow
**Use case.** Connect Tripo generation to an existing node-based image or asset pipeline.
**Steps.**
1. Connect a text input to the Tripo model-generation node.
2. Set the API key, generation mode, model version, and output options.
3. Connect the result to the 3D preview node and run the queue.
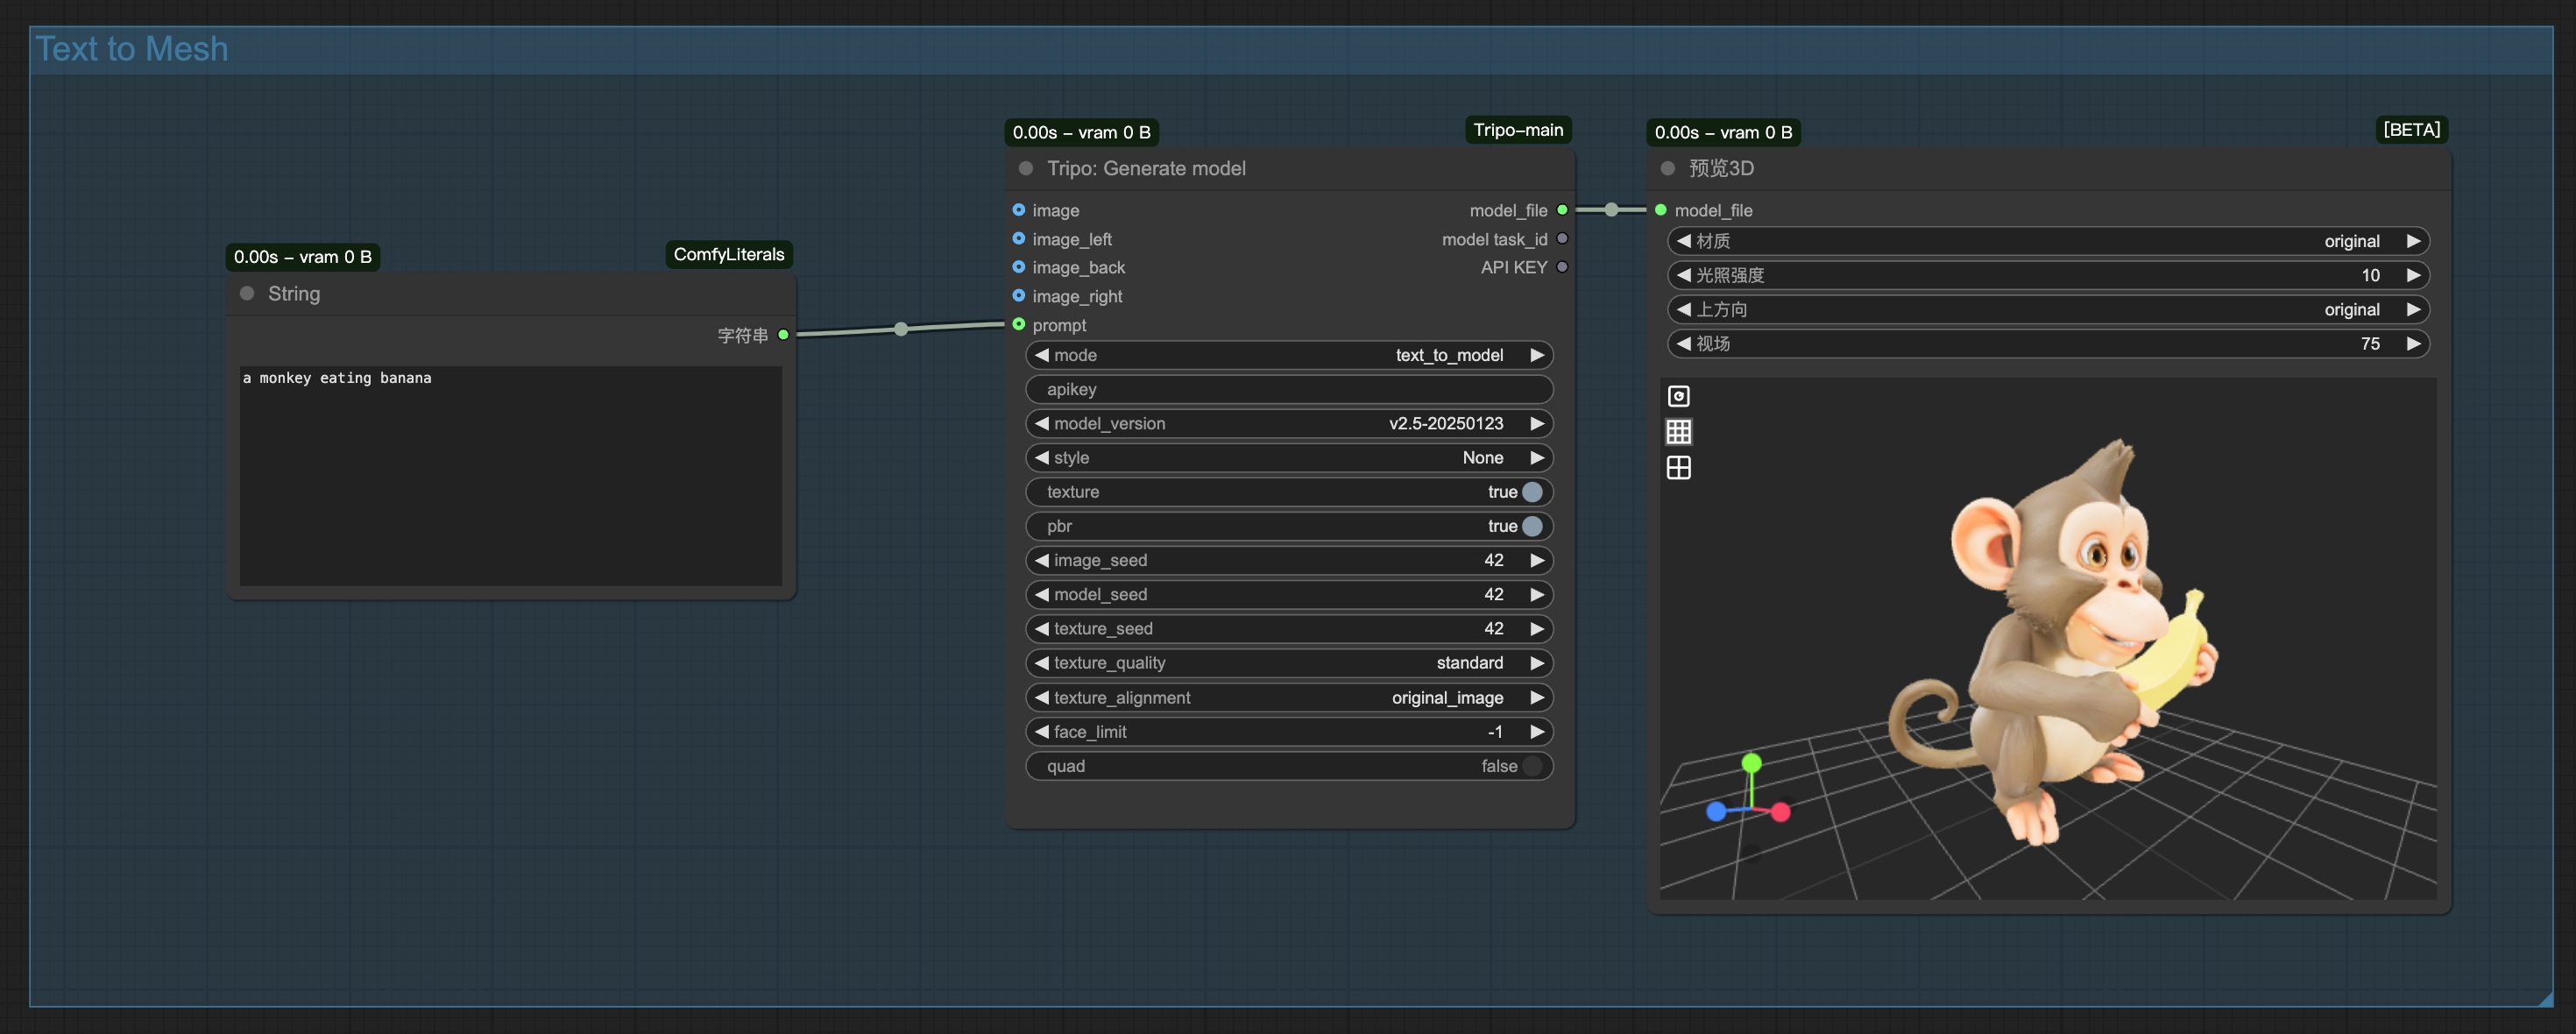
**Result.** The model is previewed in the workflow and saved automatically under `ComfyUI/output`.
Download
## Install and get started
### Unity
1. Download and extract the ZIP.
2. Move the extracted plugin directory containing `package.json` into your project's `Packages` directory.
3. Reopen the project and select `Tools > Tripo API Unity`.
### Unreal Engine
1. Download and extract the ZIP into `Plugins/Tripo3D` in your Unreal project.
2. Enable the plugin in the project settings.
3. Restart Unreal Editor.
### Blender
1. Open `Edit > Preferences > Add-ons`.
2. Choose **Install from Disk**, select the downloaded ZIP, and enable **Tripo 3D**.
3. Open the plugin from `View3D > Sidebar > Tripo 3D`.
### Godot
1. Extract the ZIP and copy `addons/tripo-godot` into the project's `addons` directory.
2. Open `Project Settings > Plugins` and enable the Tripo plugin.
3. Open the Tripo editor panel or use the provided nodes in a scene.
### Cocos Creator
1. Open `Extension > Extension Manager`.
2. Select **Project** or **Global**, click `+`, and import the downloaded ZIP.
3. Enable the extension, then open the **Tripo Model Generator** panel.
See the [Cocos Creator 3.8 extension installation guide](https://docs.cocos.com/creator/3.8/manual/en/editor/extension/install.html) for the standard ZIP-import workflow.
### ComfyUI
1. Extract the ZIP into `ComfyUI/custom_nodes/ComfyUI-Tripo`.
2. Install its dependencies from the ComfyUI Python environment:
```bash
python -m pip install -r ComfyUI/custom_nodes/ComfyUI-Tripo/requirements.txt
```
3. Restart ComfyUI and load or create a Tripo workflow.
## Configure an API key
Create a key on the [Tripo API Keys page](https://platform.tripo3d.ai/api-keys), then enter it in the selected plugin before starting a task.
An API key is a secret credential. Do not commit it to source control, include it in screenshots, print it in logs, or ship it inside a public client build. See [Authentication](/en/docs/authentication) for the general API rules.
## Related resources
- [Codex plugin](/en/docs/codex-plugin)
- [Authentication](/en/docs/authentication)
- [SDK integration](/en/docs/sdk)
- [Tripo API Keys](https://platform.tripo3d.ai/api-keys)