# Tripo 插件
在你熟悉的创作工具中直接使用 Tripo。选择适合当前工作流的插件,下载安装并连接 Tripo API Key,无需离开编辑器即可生成 3D 模型。
## 支持的插件
| 插件 | Tripo 版本 | 适配版本 | 适用场景 | 下载 |
| ------------- | ---------- | -------- | ------------------------- | --------------------------------------------------------------------------------------------------------------------------- |
| Unity | `1.0.1` | `Unity 2022+` | 生成并导入游戏资产 | 下载 |
| Unreal Engine | `1.0` | `5.6.0` | 编辑器与 Blueprint 工作流 | 下载 |
| Blender | `0.7.3` | `3.0+` | 生成基础模型后继续编辑 | 下载 |
| Godot | `0.02` | `4.4+` | 编辑器与 `Node3D` 工作流 | 下载 |
| Cocos Creator | `1.0.0` | `3.8.6+` | 在 Cocos 项目中创建资产 | 下载 |
| ComfyUI | `1.1.21` | `0.3.14` | 节点式 3D 生成工作流 | 下载 |
不同插件开放的 Tripo 能力有所区别。以下案例只描述对应安装包中真实存在的功能。
## 插件使用案例
### Unity:生成游戏道具
**使用场景。** 在场景原型阶段快速创建占位道具或后续制作的起始资产。
**操作步骤。**
1. 打开 `Tools > Tripo API Unity` 并配置 API Key。
2. 选择 **Image to Model**,上传图片并开始生成。
3. 等待任务完成,由插件下载模型并导入项目。
如需使用可选的本地运行时 **Text to Model** 流程,也可以调用安装包提供的 `TripoRuntimeCore`:
```csharp
GetComponent()
.SetAPIKey("")
.SetTextPrompt("a stylized wooden treasure chest")
.TextToModel();
```
**生成结果。** 模型作为 Unity 项目资产导入,可继续配置材质、放入场景或编辑。
下载
### Unreal Engine:通过 Blueprint 生成模型
**使用场景。** 在 Unreal 编辑器工具或 Blueprint 原型中接入模型生成。
**操作步骤。**
1. 使用插件的 Blueprint 节点创建文本、图片或多视图生成任务。
2. 通过回调和任务状态节点等待生成完成。
3. 将返回的模型地址传给下载节点。运行时展示还需要安装包文档指定的 glTFRuntime 插件。
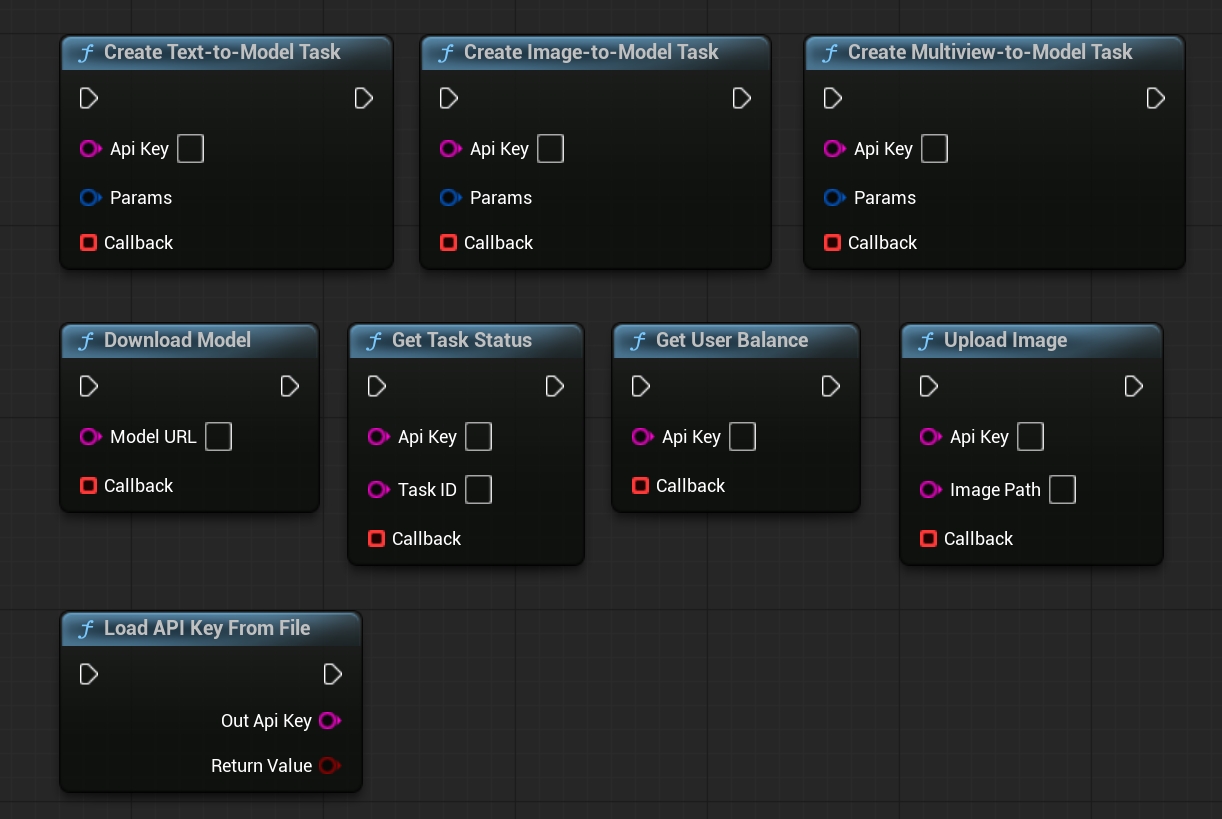
**生成结果。** 模型可以下载后导入编辑器,也可以交给运行时展示流程。
下载
### Blender:由参考图生成基础模型
**使用场景。** 先根据参考图创建基础网格,再进入 Blender 完成建模和材质工作。
**操作步骤。**
1. 打开 `View3D > Sidebar > Tripo 3D` 并连接 API Key。
2. 选择图片生成模型,上传参考图,并设置面数、纹理、PBR 或四边面等参数。
3. 开始生成,等待插件下载并导入结果。
**生成结果。** GLB 或 FBX 会导入 Blender,可继续使用标准建模工具编辑。
下载
### Godot:将生成模型添加为 Node3D
**使用场景。** 在 Godot 编辑器或本地运行时流程中生成对象,并加入场景树。
**操作步骤。** 在插件中配置 API Key,创建输入与任务节点,然后等待任务完成:
下面示例使用文本任务。图片任务可先用 `TripoUploadImage` 上传源图,再用 `TripoImageToModel` 生成模型。
```gdscript
var input = TripoTextToModelInput.new()
input.prompt = "a stylized wooden treasure chest"
var task = TripoTextToModel.new()
task.input = input
add_child(task)
if await task.launch() == TripoTask.TaskError.eSuccess:
add_child(task.save_to_node())
```
**生成结果。** 模型可以预览、保存,或作为 `Node3D` 添加到当前场景。
下载
### Cocos Creator:保存生成的项目资产
**使用场景。** 不离开 Cocos Creator,直接通过文字或图片创建 3D 资产。
**操作步骤。**
1. 打开 **Tripo Model Generator** 面板并连接 API Key。
2. 选择文字或图片输入,配置生成参数并启动任务。
3. 等待扩展下载生成完成的模型到项目中。
**生成结果。** GLB 或 FBX 写入 `assets/resources`,可供当前项目继续使用。
下载
### ComfyUI:搭建文本生成 3D 工作流
**使用场景。** 把 Tripo 生成能力接入现有的节点式图片或资产处理流程。
**操作步骤。**
1. 将文本输入连接到 Tripo 模型生成节点。
2. 设置 API Key、生成模式、模型版本和输出参数。
3. 把结果连接到 3D 预览节点并执行队列。
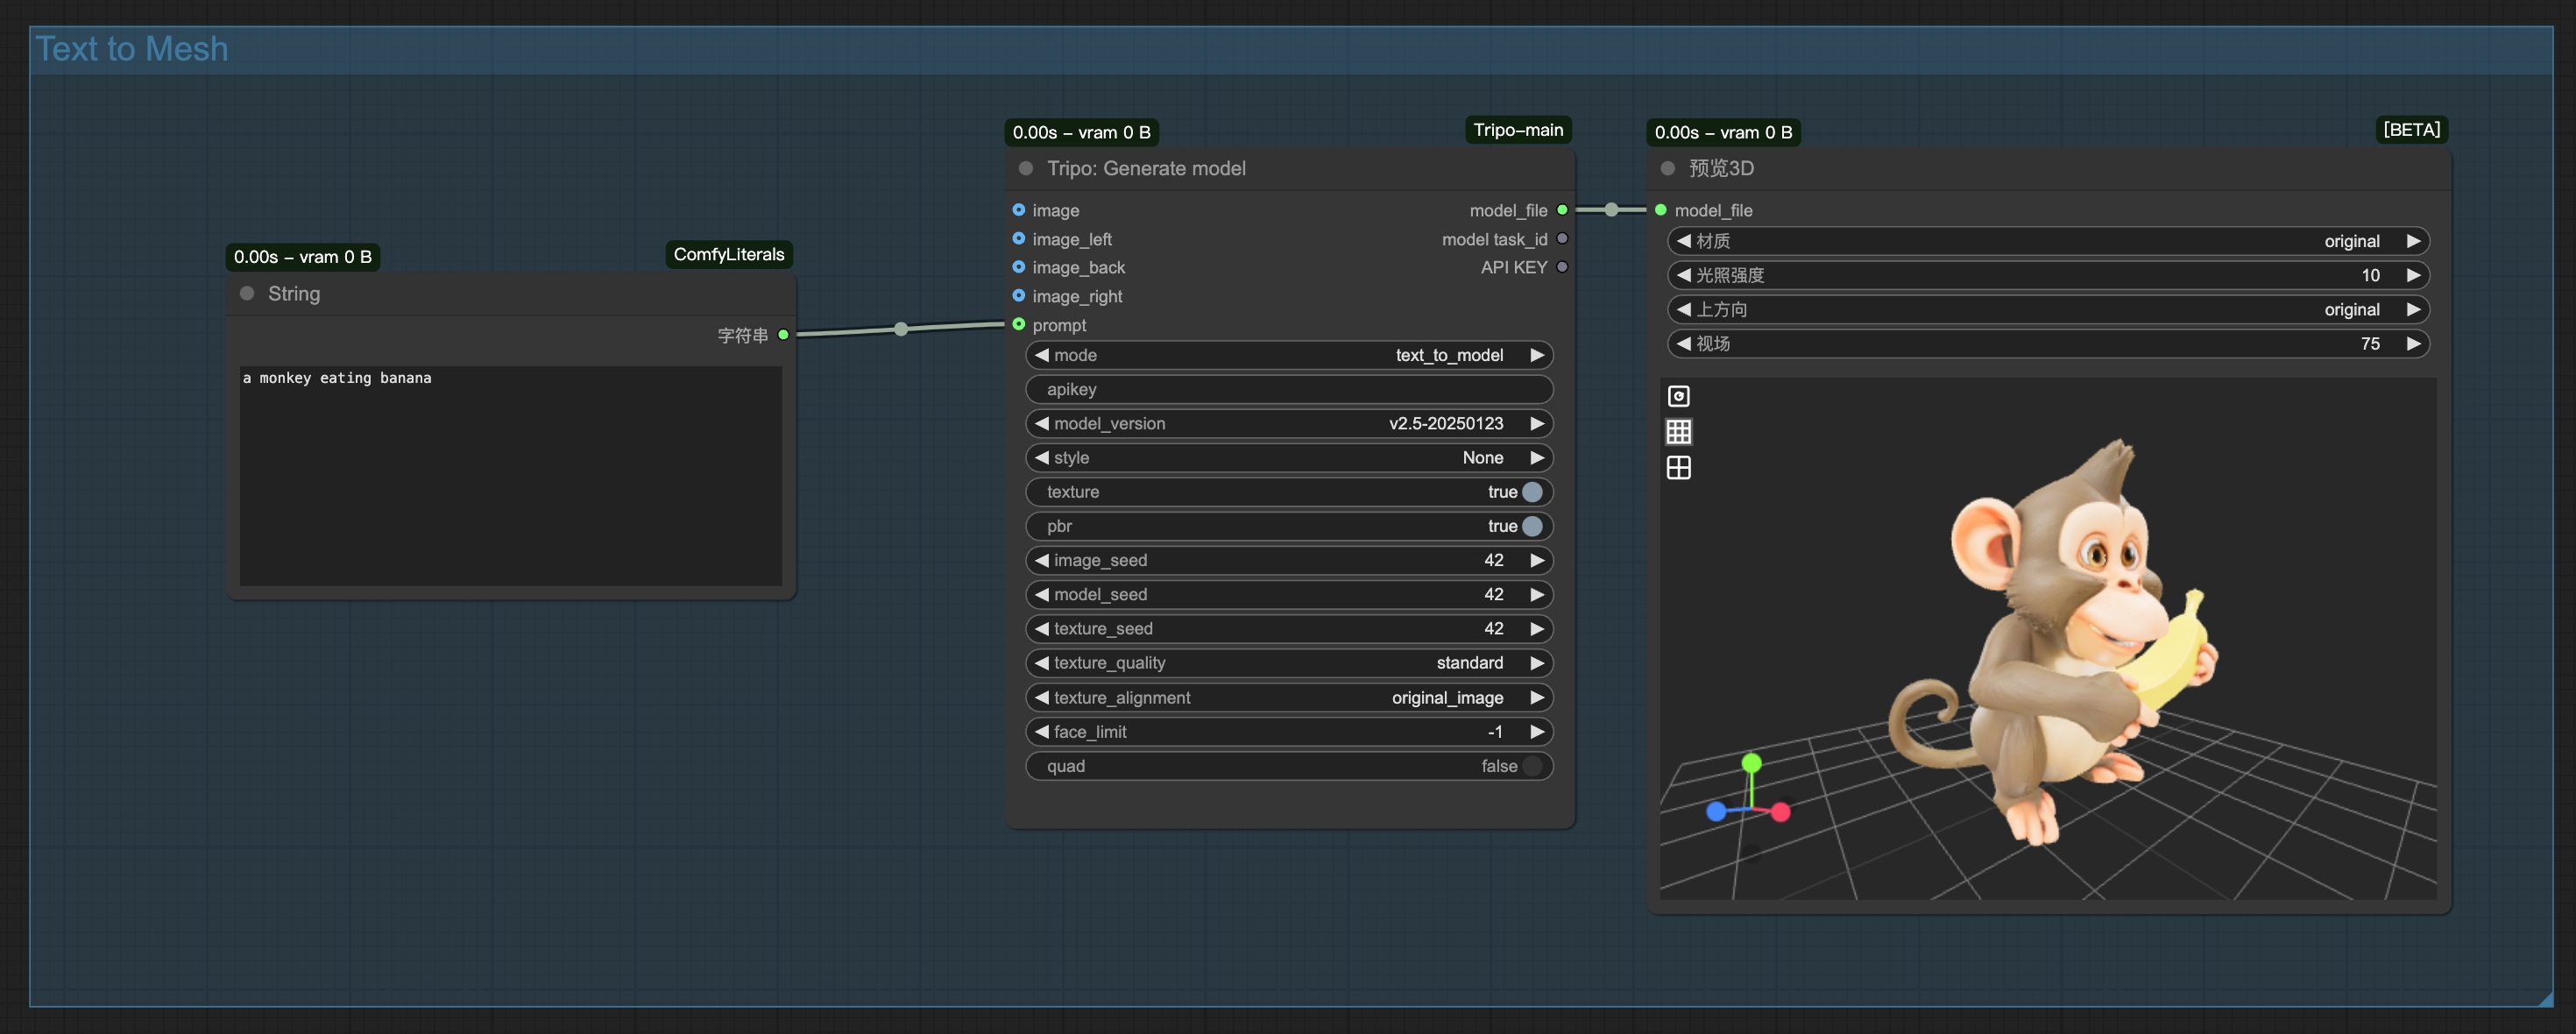
**生成结果。** 模型在工作流中预览,并自动保存到 `ComfyUI/output`。
下载
## 安装与首次使用
### Unity
1. 下载并解压 ZIP。
2. 将解压后包含 `package.json` 的插件目录放入项目的 `Packages` 目录。
3. 重新打开项目并选择 `Tools > Tripo API Unity`。
### Unreal Engine
1. 将 ZIP 下载并解压到 Unreal 项目的 `Plugins/Tripo3D`。
2. 在项目设置中启用插件。
3. 重启 Unreal Editor。
### Blender
1. 打开 `Edit > Preferences > Add-ons`。
2. 选择 **Install from Disk**,选中下载的 ZIP,并启用 **Tripo 3D**。
3. 从 `View3D > Sidebar > Tripo 3D` 打开插件。
### Godot
1. 解压 ZIP,将 `addons/tripo-godot` 复制到项目的 `addons` 目录。
2. 打开 `Project Settings > Plugins` 并启用 Tripo 插件。
3. 打开 Tripo 编辑器面板,或在场景中使用插件提供的节点。
### Cocos Creator
1. 打开“扩展 → 扩展管理器”。
2. 选择 **Project** 或 **Global**,点击 `+` 并导入下载的 ZIP。
3. 启用扩展,然后打开 **Tripo Model Generator** 面板。
标准 ZIP 导入流程请参阅 [Cocos Creator 3.8 扩展安装指南](https://docs.cocos.com/creator/3.8/manual/zh/editor/extension/install.html)。
### ComfyUI
1. 将 ZIP 解压到 `ComfyUI/custom_nodes/ComfyUI-Tripo`。
2. 在 ComfyUI 的 Python 环境中安装依赖:
```bash
python -m pip install -r ComfyUI/custom_nodes/ComfyUI-Tripo/requirements.txt
```
3. 重启 ComfyUI,然后加载或创建 Tripo 工作流。
## 配置 API Key
前往 [Tripo API Key 页面](https://platform.tripo3d.ai/api-keys)创建密钥,在开始任务前将它填入所选插件。
API Key 属于敏感凭证。不要把它提交到代码仓库、放入截图、输出到日志或打包进公开客户端。通用 API 规则请参阅[认证方式](/zh/docs/authentication)。
## 相关资源
- [Codex 插件](/zh/docs/codex-plugin)
- [认证方式](/zh/docs/authentication)
- [SDK 调用](/zh/docs/sdk)
- [Tripo API Key](https://platform.tripo3d.ai/api-keys)