

01 / OVERVIEW
Overview
Kimi K3.1 Pro’s launch video showed 3D web pages, mechanical parts, buildings, small game demos and a AAA-grade game trailer, all made with Kimi.
How do you get the most out of Kimi in 3D and make polished, interactive work with striking scenes and camera moves? You may have heard of Blender, Three.js and Rhino, seen characters generated with Tripo, and know game engines such as Unity, Unreal Engine and Godot, yet still not know where to start.
You don’t need to learn Blender, Three.js or Unreal Engine first to make original 3D work with Kimi. This guide is adapted from the Kimi Team’s official 3D tutorial and shares their internal 3D workflow, along with how to use the Kimi K3.1 Pro model and Kimi’s harnesses.
Roughly, Kimi makes a 3D work in four stages:
- Describe the goal: explain what you want with a prompt, images or video.
- Build the model: Kimi writes code (Three.js, Blender, Rhino, CAD) or calls a generation service such as Tripo. The two paths can be combined.
- Assemble the scene: check and adjust scale, materials and lighting as needed, then put it together in Unity, Unreal Engine or Godot. Engineering models can also be delivered directly as source projects, STEP or STL files for manufacturing.
- Use the result: rendered images and animation, an interactive Three.js page you can rotate, recolor and click, or a game-engine demo.
02 / OVERVIEW
3D Modeling: Parametric and Mesh
The first step of any 3D work is having Kimi build the model. Agents like Kimi build models in two main ways: writing code that constructs the model directly, or calling a 3D generation service such as Tripo. Each suits different jobs:
- Parametric modeling: for anything you can describe with dimensions, structure and rules, such as product forms, furniture, mechanical parts and buildings.
- Mesh modeling: for detailed work such as human and animal characters, statues, monsters and complex props.
When writing code to build a model, Kimi picks the tool itself. Every button in Blender, Unity, Unreal Engine or Godot can be written as a Python script, and Kimi K3.1 Pro was trained specifically to drive 3D tools through Python scripts, so even niche software without MCP support is usable.
Mesh modeling is something large language models such as K3.1 Pro still don’t do well, and diffusion models such as Tripo do better: they have learned the shape patterns of huge numbers of 3D objects and can infer volume from the outlines and occlusion in a reference image. So for tasks better suited to mesh modeling, such as people and animals, Kimi prepares the prompt and reference images itself and calls model tools such as Tripo to do the job.
Depending on the task, Kimi combines the two approaches and their tools:
| Use case | Tools Kimi calls | What Kimi does |
|---|---|---|
| Adjustable forms, interactive web pages | Three.js, a web 3D library | Writes JavaScript to create shapes, materials and interaction |
| Models, scenes, animation and rendering | Blender, an all-round 3D suite | Writes Python to create objects, set materials, light and render |
| Parts, brackets and housings with exact dimensions, products, jewelry | CadQuery, FreeCAD, Rhino | Writes Python or C# to define dimensions, geometric operations and engineering relationships in code |
| Characters, statues, complex props | Dedicated 3D generation services such as Tripo | Sends a prompt or reference image, submits the generation task, waits or polls for progress, and fetches the returned mesh |
Kimi can’t guarantee a perfect result every time. Sometimes it takes a few rounds of adjustment, and sometimes a small trick avoids the problem altogether. The tips section below covers how to handle these cases.
03 / OVERVIEW
Build Games: Assemble Models and Design Gameplay
With 3D models in hand, you can move on to a game or a film. A game engine organizes the 3D assets and gameplay so the scene becomes something you can play: characters walk, objects collide, quests and scores are added, and camera moves and cuts can be designed.
By writing code and calling tools, Kimi can import 3D models into game engines, build the scene and implement the gameplay step by step. Kimi is well adapted to common engines such as Unreal Engine, Unity and Godot: the first two suit larger game projects, while Godot suits quick development of lightweight games.
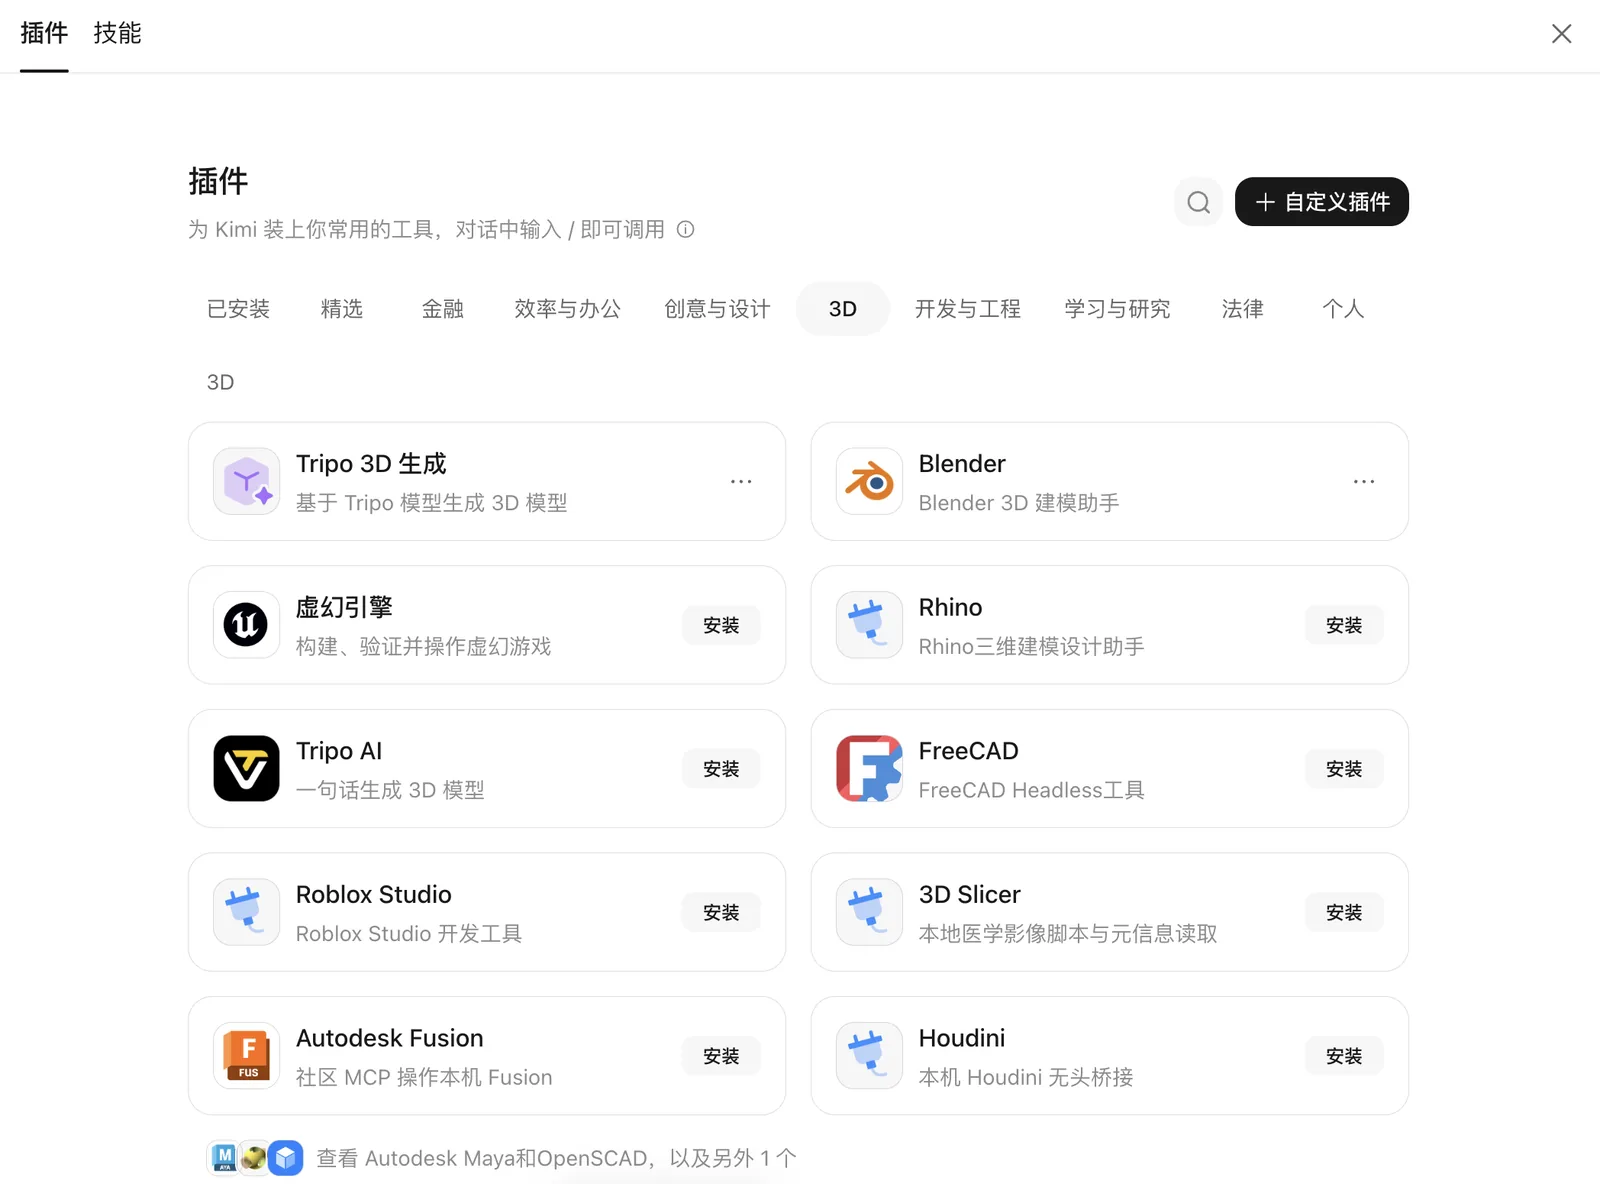
These are the 3D modeling and game-engine plugins Kimi currently supports (plugins that need a local install work only in Kimi Work):
04 / OVERVIEW
From Models to Harnesses: What to Choose
Kimi offers AI tools from raw models to agent products. Here is how to choose:
- For a quick 3D web page or a simple single model, use kimi.com. There is nothing to download or install.
- To drive modeling software, assemble 3D scenes in a game engine or build complex gameplay, use Kimi Work or Kimi Code. They operate local software such as Unity and Unreal Engine and iterate on your local project.
- To bring Kimi models into your existing workflow, use the Kimi API.
| Entry point | Best for | How to start |
|---|---|---|
| kimi.com | 3D showcase pages, modeling, interactive prototypes | Describe the idea, provide reference images, then iterate in the preview |
| Kimi Work | Driving local modeling software and game engines | Enable the plugins, provide assets, and let Kimi call the tools to make it |
| Kimi Code | Ongoing iteration on 3D and game projects | Open the project folder and let Kimi write code, run it, and check and fix problems |
| Kimi API · K3.1 Pro | Kimi’s strongest 3D model, for complex modeling and multi-step production | Call the model through the API and bring your own tools, runtime and evaluation |
| Kimi API · K2.8 | The cost-effective everyday model, for daily development, batch jobs and rapid iteration | Same as above |
The entry points also work together. For example, test a few ideas in parallel on kimi.com, then hand the project to Kimi Code for further development.
3D Make: specialist skills, plugins and workflows
kimi.com and Kimi Work also offer 3D Make, which gives you the 3D generation skills and specialist workflows Kimi has prepared for more refined 3D work. Usually you don’t need to remember any skill or plugin names: describe the goal and Kimi calls what it needs. When you want to specify a workflow, use this table:
| Skill / plugin | What it does | Where |
|---|---|---|
game | Makes playable browser games, Three.js 3D by default | kimi.com, Kimi App, Kimi Work |
content-creation | Makes showcase visuals: 3D scenes, animation, SVG illustrations, voxel art and Blender models | kimi.com, Kimi App, Kimi Work |
3d-printing | Makes models for 3D printing with tools such as Blender and CadQuery | kimi.com, Kimi App |
| Tripo 3D Generation | Calls the Tripo API for character and animal modeling and produces high-detail GLB files | kimi.com, Kimi App, Kimi Work |
| 3D Editor | Imports assets into Edit3D for the agent to keep editing, including materials, lights, cameras and animation, then exports the edited GLB or a video | Kimi Work |
Build (webdev) | Creates and validates static sites, Three.js 3D pages or browser games and publishes them as Kimi static sites | Kimi Work |
05 / OVERVIEW
Example 1: An Eastern Celestial Palace in Unreal Engine
Entry points: Kimi Work, Kimi Code. Plugins: Blender, Unreal Engine, MetaHuman.
Kimi K3.1 Pro’s official launch video features an Eastern mythological celestial palace built in Unreal Engine 5.8, with the hero created in MetaHuman. Here is the full process.
To try something similar, first generate the picture in your head with an image AI, such as a swordsman walking through the celestial palace as a giant dragon rises into the dusk sky:

Then give the image to Kimi with a prompt structured like this, and let it write the code, gather assets and assemble the scene:
Create an Eastern celestial palace scene. First, based on my reference image, build the colonnade and the giant dragon separately in Blender. Then place these elements in Unreal Engine, add volumetric clouds and open-source moon assets, render the high-precision architecture and dragon with Nanite, and use Lumen for dynamic global illumination and reflections.
Getting the signature shot right before expanding the scene, building characters and adding detail makes it easier to keep the style and image quality consistent.
Once the base scene is in place, if you want to star in the game yourself, record a 20-second video of yourself with Live Link Face, Epic Games’ official app, and tell Kimi:
There is a video of a person in Live Link Face now. Please import it into MetaHuman Editor.
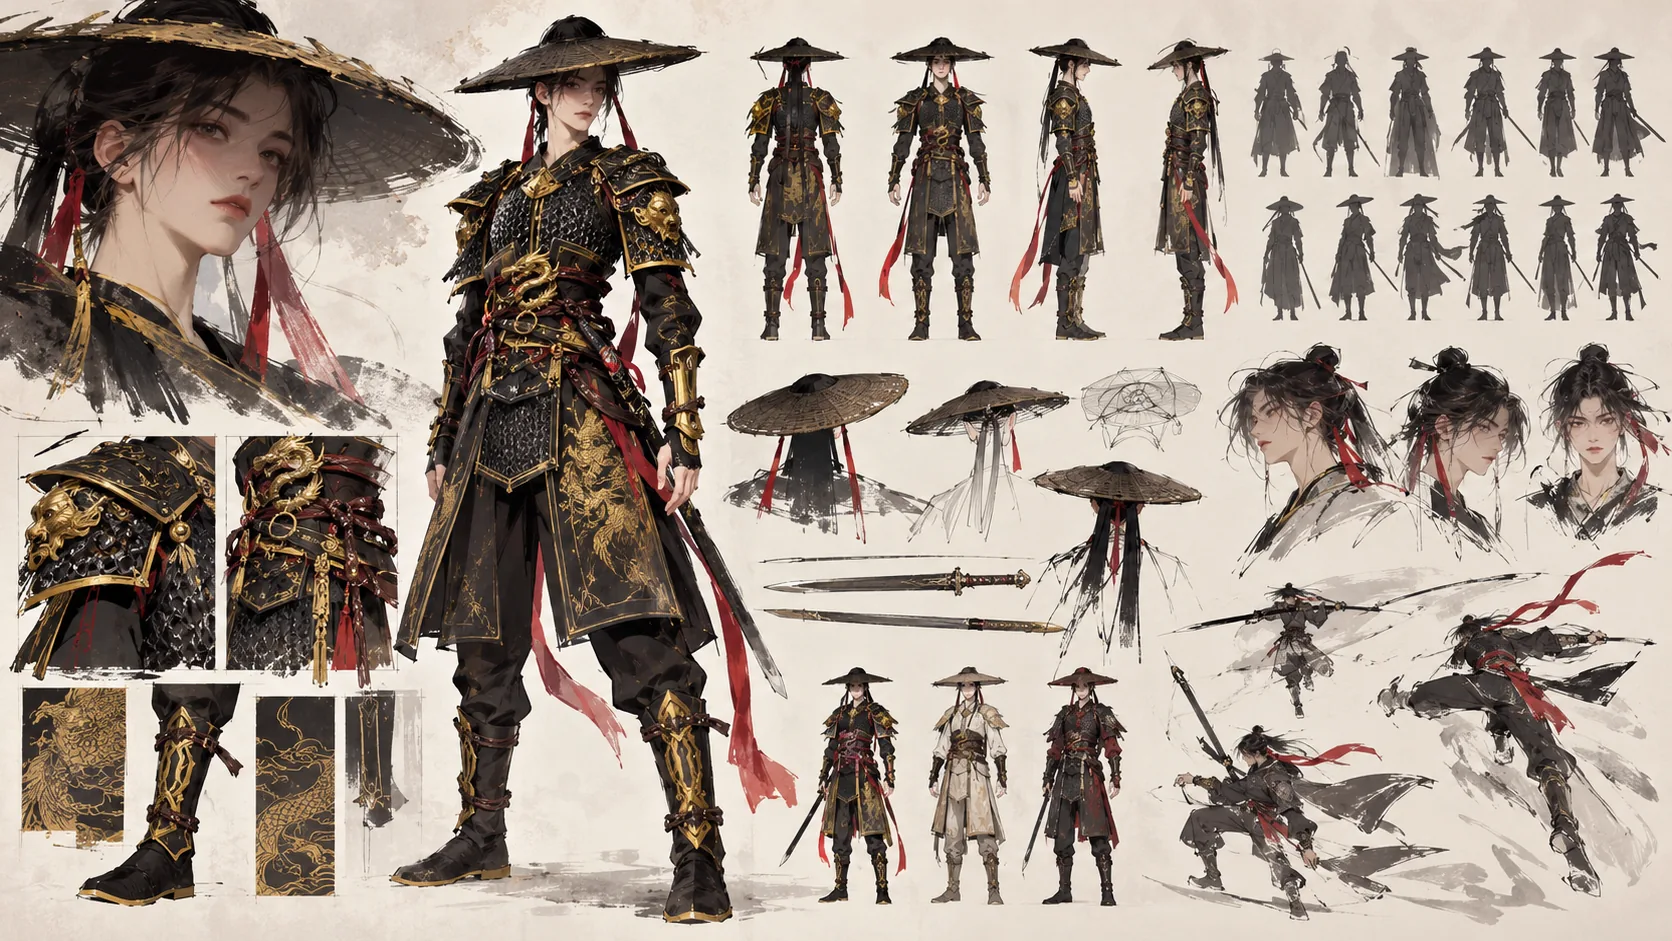
After the import, adjust the character’s parameters in MetaHuman Editor yourself or let Kimi do it. Then keep refining the character with details such as clothing and weapons. For example, give Kimi multi-view reference images of the costume and have it make the clothes in Blender, iterating until you are happy:
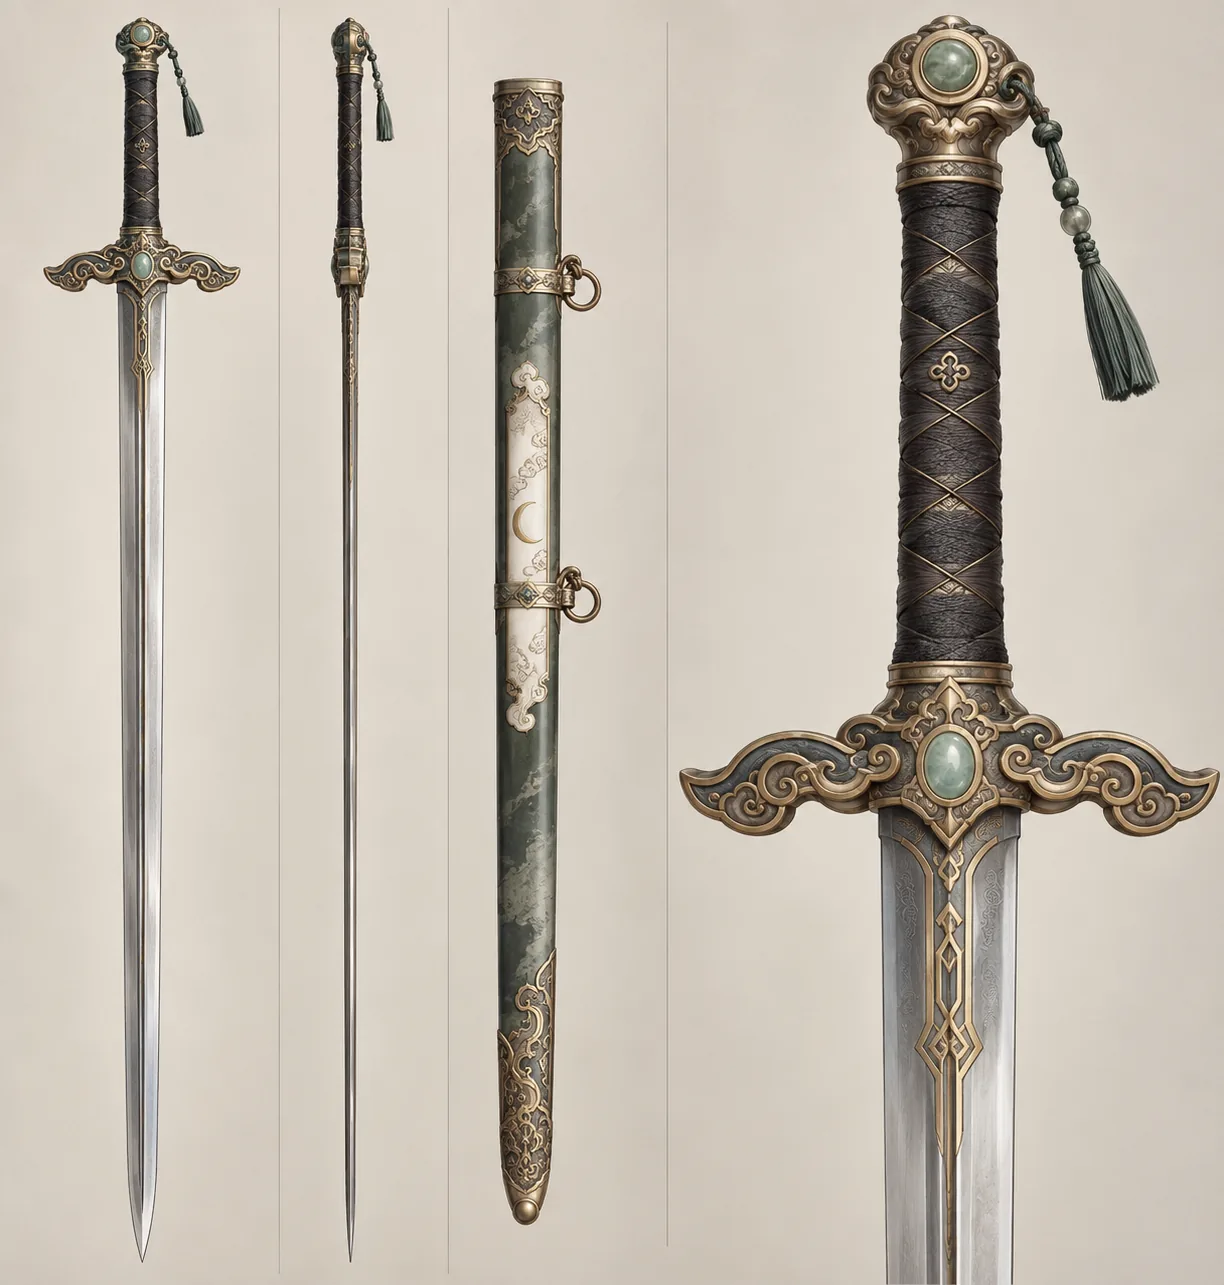
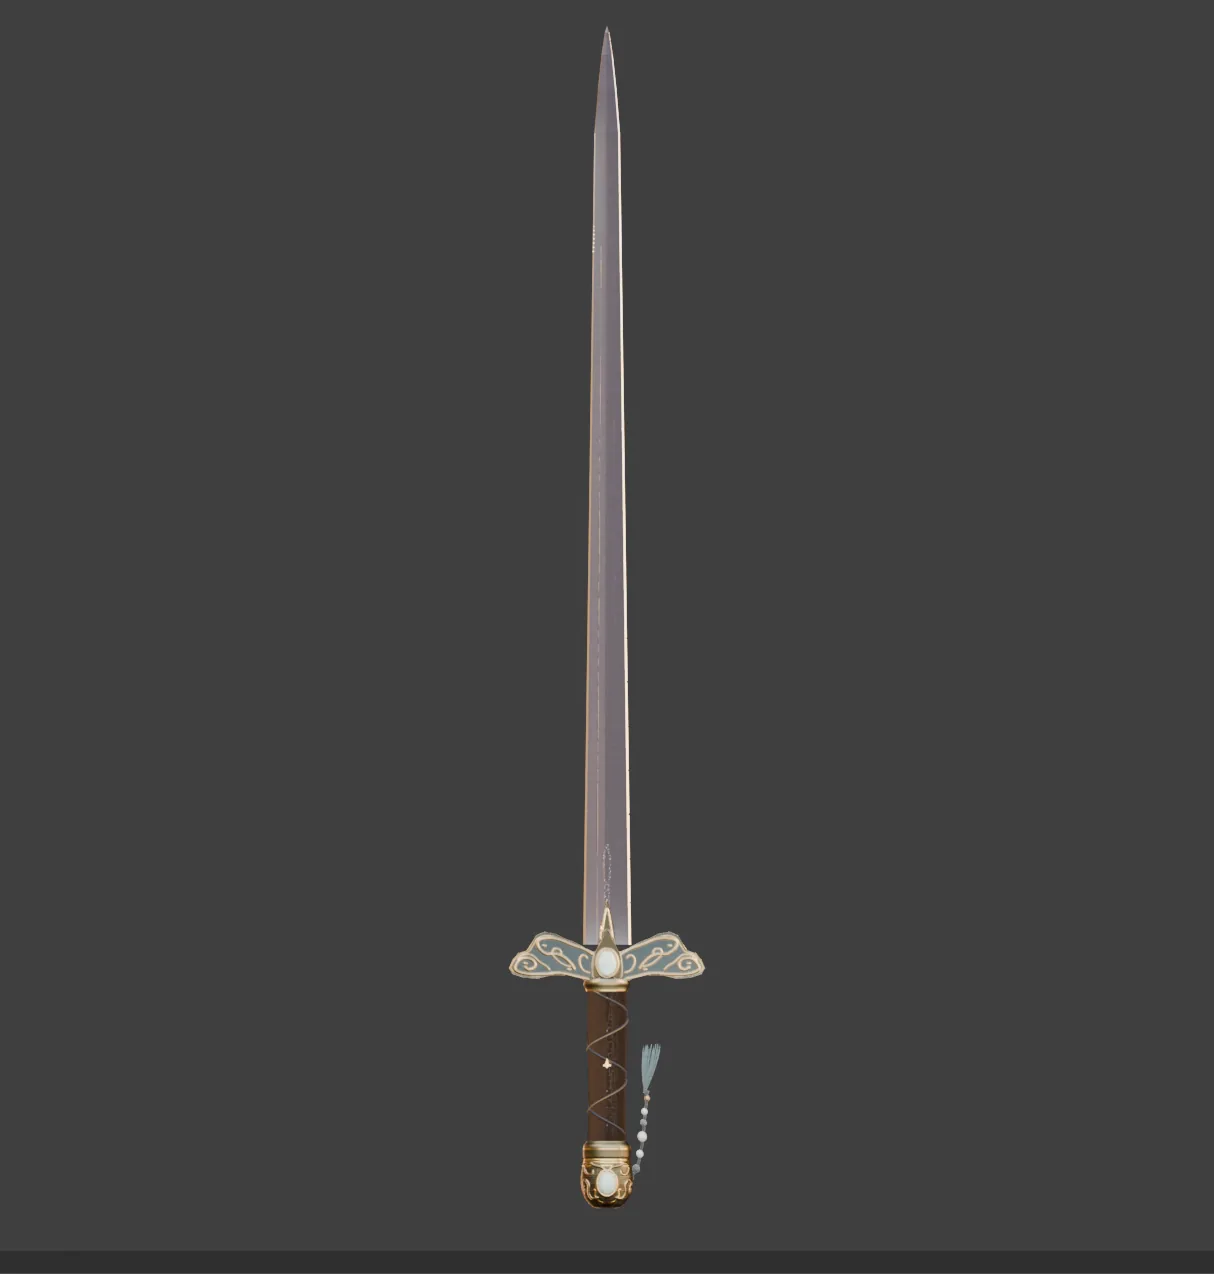
Weapons work the same way: generate an image with AI, then have Kimi model it in Blender:
Finally, have Kimi assemble all the assets, add hit effects and camera moves, and keep adjusting the layout and positions until you get a film like this:
In this example, Kimi combined procedural modeling, a digital human and engine rendering:
- Build the elements in Blender: find a reference image for each element (AI-generated is fine), then have Kimi model the colonnade and the dragon procedurally in Blender against those references, iterating until the forms and details are right.
- Assemble the scene in Unreal Engine: put the architecture, the dragon and the MetaHuman hero in one space and adjust scale, position and camera so the character contrasts with the huge buildings.
- Finish the look: the scene’s source models total 36 million triangles. Kimi chose on its own to render the high-precision geometry with Nanite, and used Lumen for dynamic global illumination and reflections.
06 / OVERVIEW
Example 2: A 3D-Printable Lamp
Entry point: 3D Make on kimi.com. Skill: 3d-printing.
Start with a reference image of a lamp you like. Here the inspiration is an architectural lamp by Xiaohongshu creator @锦州琛哥, reworked as a pierced lamp modeled on a Fujian tulou earthen building.
Tell Kimi the target size at the same time, and send the specs of the light and battery parts you plan to use, so it leaves room for mounting and cooling while modeling:
Using this image as reference, design a desk lamp modeled on a Fujian tulou that can be 3D-printed and assembled. Total height about 25 cm, shade diameter about 15 cm. It uses an LED light module measuring xxxx. Split the shade, support structure and base into parts that can be assembled, and leave mounting space and cable holes. Keep the modeling code and export each part as an STL file.
Kimi builds the model through tools such as Blender and CAD on its own. If you then want a wider shade, a steadier base or more detail, keep adjusting over more rounds.
Before printing, you can also have Kimi load the files into slicing software to check dimensions and supports and confirm the print is feasible. Here is the finished lamp:
07 / OVERVIEW
Example 3: A Building from Pure Blender Code
Entry points: Kimi Work, Kimi Code. Tool: Blender.
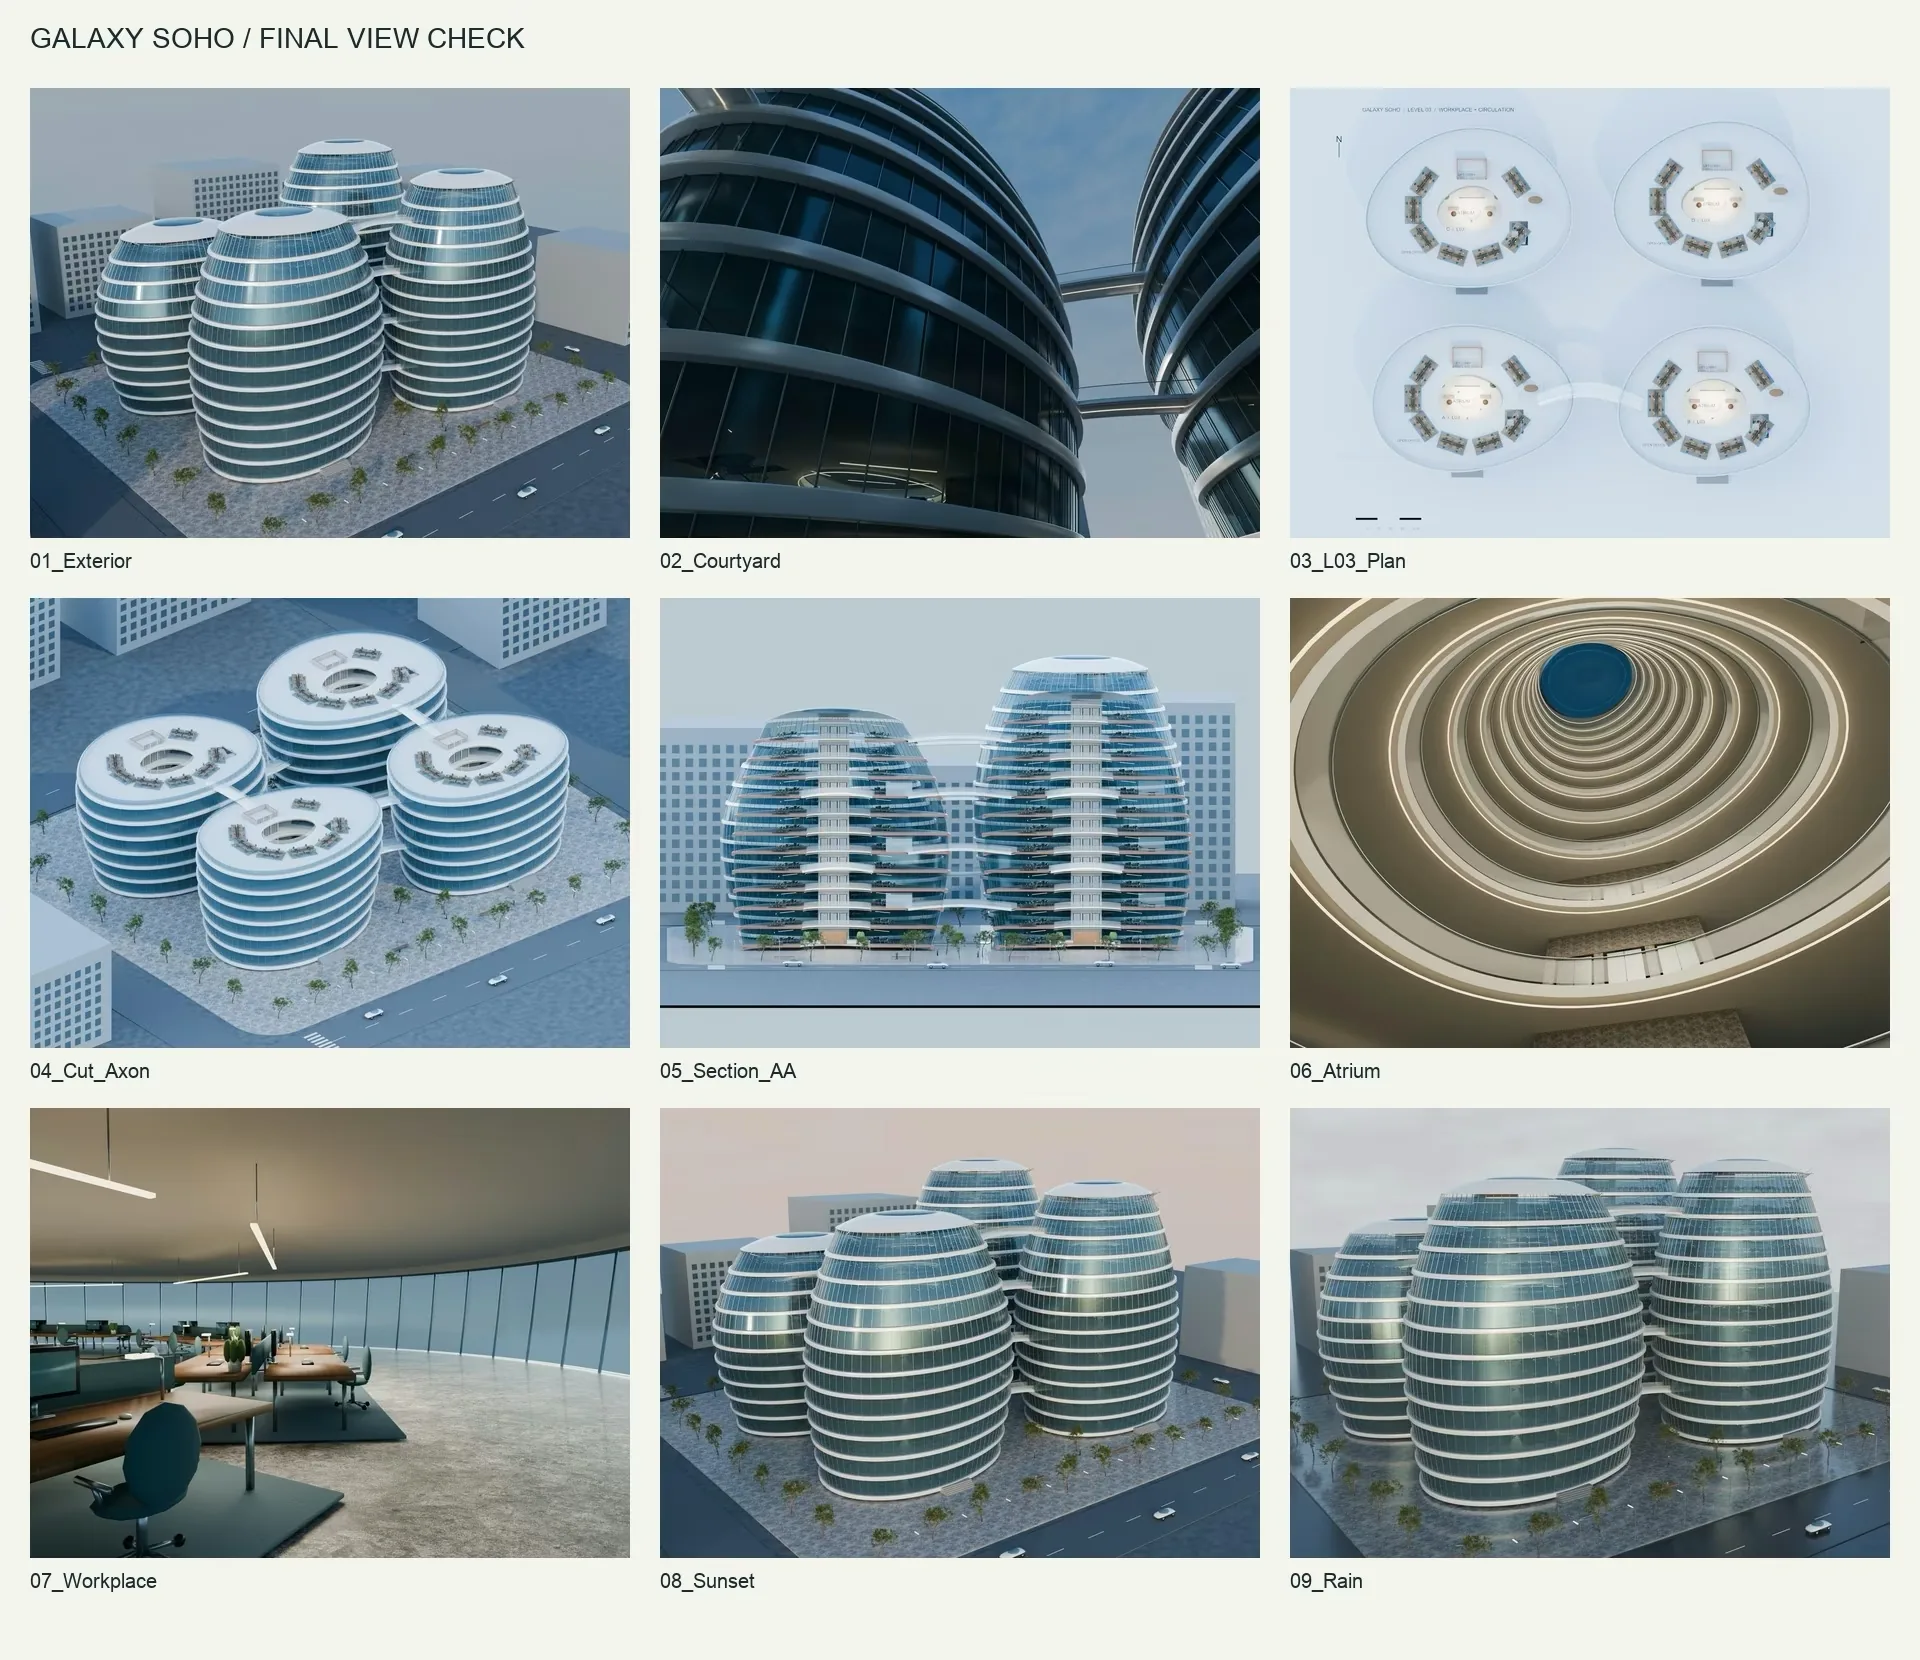
Driving Blender with pure code, Kimi K3.1 Pro can produce a decent building model from a single prompt. Set the thinking effort to its top or advanced level so the model gets more detail.
To try it, tell Kimi both the architectural character and the spatial requirements:
Make me a model in the style of Beijing’s SOHO buildings, presented with plans and sections from several angles. It needs a complete interior design, including office areas and circulation space, and should reflect Zaha Hadid’s design thinking. Match the visuals to suitable times of day, and let the surroundings, weather and daylight change according to my settings. The architecture and rendered textures should be photorealistic. You can use PBR textures to enhance the overall look.
Before modeling, Kimi searches public design material to settle the exterior and interior scheme, then calls Blender to generate the models one by one and assemble them. For materials and landscaping, Kimi also finds stone and wood textures and realistic tree models on its own and binds the textures to the matching materials.
08 / OVERVIEW
Example 4: A Miniature City with Tripo and Blender
Entry point: Kimi Work. Plugins: Tripo 3D Generation, Blender.
To enrich a 3D work, have Kimi call Tripo to generate some refined model elements. For example, give Kimi a few city reference images and tell it that it can call Tripo for assets such as sculptures:
Using these images as reference, make a miniature hillside town. Build the rolling terrain, woods, streets and the steps linking different heights with Blender scripts. Generate the plaza fountain, statues and signature landscape assets with Tripo, then import them into Blender for assembly. Unify scale, materials and lighting, render a showcase video orbiting the town, and keep the project files.
Kimi handles three steps on its own:
- Build the scene in code: Kimi creates the terrain, lays streets and steps along the slopes, and generates and places trees by rule. Hill height, road width, step count and tree density can all be parameters for easy tweaking.
- Add hero assets with Tripo: the fountain, statues and other objects are generated one by one, checked for shape and imported into Blender.
- Unify the look in Blender: adjust asset positions and scale, check road connections, step joins and that objects sit on the ground, then set up materials, lighting and cameras.
With the first round in hand, confirm the layout before adding detail. You can also ask Kimi for a top view and a street-level view to check the spatial relationships first; once you are happy, add landscape assets and camera moves, and keep the .blend project and modeling scripts so the town can keep growing.
Kimi’s Tripo plugin calls the Tripo API. To add the same generation capability to your own agent or workflow, start with the Tripo API docs.
Tripo API docs09 / OVERVIEW
Five Tips from the Kimi Team
While building the product and the launch video, the Kimi Team used Kimi K3.1 Pro and its harnesses heavily. These are the five tips the whole team agrees help most.
Show, don’t tell: give reference images and video
Reference images and video are often clearer than words. For an image used to generate a single model, keep the subject whole, the background simple and the outline clear; if you provide several angles, make sure the form, proportions and accessories match. If you have no suitable image, ask Kimi to write up the composition requirements and call an image generation tool to make a design sheet, and confirm the shape before modeling. Mechanical parts also need dimensions marked, such as hole diameter, hole spacing and plate thickness.
Reference video helps too: beyond the visual style, it shows how the camera should move and how scenes should cut.
Let Kimi write the complex prompts
If you don’t know the modeling jargon, have Kimi analyze your references first and turn your idea into production requirements:
Analyze the form, proportions, materials and lighting in this image and write me an executable 3D production prompt. For anything you can’t see clearly, list your guesses.
Check its understanding, add the details you care about most, then say: “Start making it from this prompt.”
Kimi is better than we are at writing specific prompts: “matte white shell, dark gray joints, blue display” is far easier to execute than “refined and high-tech”. Requirements such as exact dimensions, face count and rigging still have to be enforced through tool parameters or later steps.
Build the scene first, then refine models, materials and lighting
For a complex scene, have Kimi lay it out with simple shapes such as boxes and cylinders first. This blockout stage is for checking proportions, positions and spatial relationships:
Block out the exhibition hall first and render three angles: the entrance, the front and the top. Once the layout is confirmed, add the full models and materials.
Check the result at every step: spin the model around, actually play the game, watch the whole camera move. When something is wrong, attach a screenshot and point to the spot:
Keep the current head and body proportions, and fix only where the arm is fused to the torso.
Tell Kimi explicitly which parts you are happy with, so the next round focuses on what needs fixing. Once the shape is settled, polish materials and lighting: if the model looks plasticky, the surface roughness may need work; if metal looks dull, it may need better environment reflections. Keep the model and camera fixed and have Kimi compare a few lighting setups:
Try soft studio lighting, warm side lighting and cool rim lighting, and render previews for me to choose from.
HDRIs from Poly Haven are worth trying too. They capture the brightness and color of a real environment and can light the scene and provide reflections.
Stand on others’ shoulders: asset and animation libraries
Furniture, trees, rocks, sound and animation can all start from ready-made assets. Pick a stylistically consistent pack, then have Kimi make the characters and props unique to your work; for interactive web pages, a mature animation library can enrich the presentation. Three resources to try:
- Poly Haven: a public 3D asset library from its team and partner artists, with models, textures and HDRIs, well suited to realistic scenes. Assets are CC0: free for commercial use, modification and redistribution, with no attribution required.
- Kenney: complete game asset packs with 3D models, UI and sound effects, good for quickly building small games in a consistent style. Assets are CC0: commercial use allowed, no attribution required.
- GSAP: a JavaScript animation library built by GreenSock and now owned by Webflow. It choreographs movement, scaling, rotation and color changes, and can drive model and camera animation together with Three.js. All plugins and tools are free for commercial projects under its own license.
When building a scene, have Kimi find the resources first and put the downloaded assets in the project folder:
Build a forest exploration scene with this asset pack. First list the assets you can use as they are, then fill in what is missing and unify scale and style. Also compile an asset list recording source links, licenses and attribution requirements.
For a showcase page, name the animation library and the effect you want, and let Kimi work out the rest:
Make a forest showcase page with Three.js and GSAP. As the user scrolls down, the camera moves slowly along the path, and intro text appears in turn as it passes each area.
Finish one small scene or one complete animation before expanding: check that the interaction feels natural and loading is smooth, then add more. Save the asset packs and animation code that work well for reuse next time.
Have Kimi save what worked as a Skill
Once you have a result you like, have Kimi turn the method into a Skill for next time. For a product showcase site, for example, Kimi can save the usual material and lighting templates, camera settings, preview checks and export formats, along with the related scripts and references:
Turn the production workflow we just validated into a Skill. Make the product dimensions, main color and shot length adjustable, include the checking steps, and keep the project files.
The asset library stores materials; Skills store methods. As projects accumulate, each new one can start from existing models, templates and workflows.
10 / OVERVIEW
What’s Next for K3.1 Pro
K3.1 Pro showed the Kimi Team more of what AI can do in 3D creation, as well as where it still falls short and which problems to solve next:
- Rigging: more natural character motion and body deformation.
- More complex materials and physics: from metal, diamonds and fur to water and fire, with more realistic surfaces and motion.
- Fuller, more believable 3D worlds: sensible proportions and a unified style across complex scenes, with natural interaction and physics.
The Kimi Team will keep improving the Kimi models and harnesses so Kimi can use professional tools better and handle complex scenes, helping everyone turn the worlds in their heads into work you can watch and play. Happy building!
SOURCE / Kimi
How to Build Better 3D Projects with Kimi
This article is an original editorial adaptation of the original piece from Kimi.