

Tripo CLI: Let AI Turn Text and Images into 3D Models
Tripo CLI is built for AI agents, making 3D creation as simple as chatting. Whether you are working in an AI coding tool such as Codex, Claude Code, or Cursor, or using the CLI directly, a single natural-language description, an image, or an existing model is all it takes to generate or transform 3D models, animations, and other assets. The CLI completes the entire workflow automatically—no need to understand APIs, model versions, or complex parameters.
Should I use the CLI or the API?
Tripo comes in two flavors—take ten seconds to pick the right one:
| Product | Best for | Where to go |
|---|---|---|
| Tripo CLI (this page) | Beginners: quickly tap into AI 3D capabilities through popular vibe coding tools | Keep reading |
| Tripo API | Professional developers: integrate AI 3D capabilities into websites, apps, or your own business systems | Quick start |
Not sure? Just try this page first: installing is free, and credits are only spent when you actually generate a model.
Install and sign in (pick one of two paths)
Pick one of the two installation paths below.
Path one: let AI install it for me (recommended)
If you already use Cursor, Claude Code, Codex, or another AI assistant that can run terminal commands, this is the easiest path. Copy the prompt below and send it to your assistant in full:
Set up Tripo CLI for me and explain each step. Check that Node.js 20 or later is installed, then run npm install -g tripo-cli. If this is Windows PowerShell and running scripts is disabled, run Set-ExecutionPolicy -Scope CurrentUser RemoteSigned (not as Administrator) and retry. Before signing in, ask which site my account uses: international developers.tripo3d.ai (ov) or China mainland developers.tripo3d.com (cn). Do not guess from my language or sign-in method. Run tripo login --region ov or tripo login --region cn according to my answer. Relay the verification URL and one-time code to me, and keep the command running while I authorize in the browser; do not ask me to paste an API key into chat. Finally, run tripo doctor and tell me whether authentication, network access, and balance checks pass.
What happens next:
- The AI checks your computer and helps you install Node.js first if it is missing;
- The AI runs the install command;
- Your turn: confirm your account site, open the verification URL provided by the AI, and enter or check the one-time code shown in the terminal before authorizing (this step must be done by you; never send any key to the AI);
- The AI runs
tripo doctor; once every check passes, setup is complete.
Then jump straight to the next section, “Create your first 3D model”.
Trouble? The AI got stuck or hit an error
- Paste the terminal error back to the AI as-is and let it continue; it can solve most problems;
- Sign-in did not complete: reopen the sign-in page and double-check the verification code shown in your terminal before approving;
- If nothing works, fall back to “Path two: install it myself” below—it is only three commands.
Path two: install it myself
No AI assistant? No problem—the whole process is three commands.
Step 1: install Tripo CLI
This command installs the tripo command on your computer:
npm install -g tripo-cli
Normally the progress finishes without red error text, which means the install succeeded.
Already installed? Run tripo update --check to check for a newer version, then tripo update to install it.
Trouble? npm not found, or a permissions error
npmnot found: Node.js is not installed yet. Install the current LTS version (20 or later) from the Node.js website, then reopen the terminal and try again;- Permission error on macOS (EACCES): run
sudo npm install -g tripo-cliinstead and enter your computer password when asked; - Windows says “running scripts is disabled”: run
Set-ExecutionPolicy -Scope CurrentUser RemoteSignedin PowerShell (Administrator is not required), reopen the terminal, and try again. More examples are in “Windows / PowerShell” below.
Step 2: sign in to your Tripo account
For an international account on developers.tripo3d.ai (Stripe billing), run:
tripo login --region ov
For a China mainland account on developers.tripo3d.com (Alipay), use tripo login --region cn instead. In an interactive terminal, tripo login without a region asks you to choose the account site first.
Your browser opens the selected site’s authorization page automatically (register there first if you do not have an account yet). Enter or check the one-time code shown in your terminal, then authorize. After authorization, the CLI receives the key automatically and confirms you are logged in.
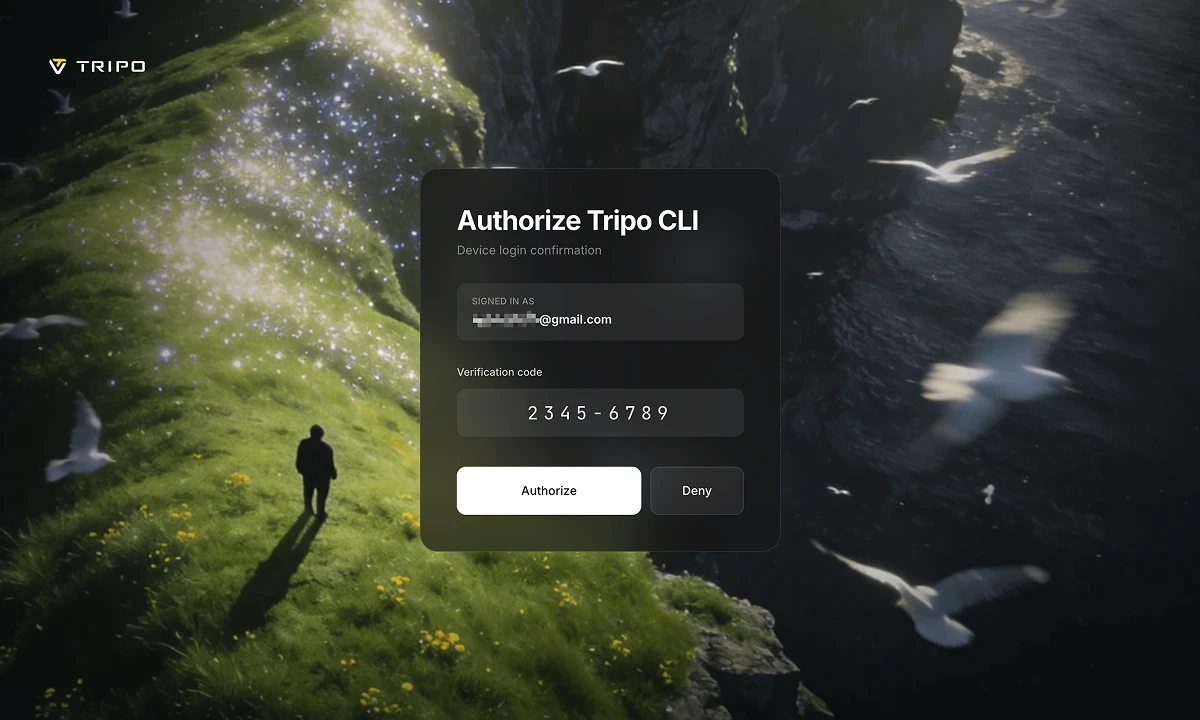
Trouble? The browser did not open, or sign-in did not complete
- Sign-in did not complete: run
tripo loginagain, and approve only after double-checking the code shown in your terminal; - The browser never reacts: copy the URL printed in the terminal into your browser manually;
- Browser authorization is temporarily unavailable: an interactive terminal falls back to the API key page. In an AI agent or other non-interactive session, use
TRIPO_API_KEYwith the correctTRIPO_REGION, runtripo login --key tsk_..., or retry in an interactive terminal—see “Backup sign-in and regions” below.
Step 3: check that everything is ready
tripo doctor
It checks your sign-in status, network access, and credit balance in turn. When all three pass, setup is complete.
Trouble? One of the checks failed
- Authentication failed: sign-in did not complete—run
tripo loginand sign in again; - Network failed: confirm your computer can open web pages; corporate or campus networks may need a proxy;
- Balance failed: you do not have enough credits; nothing has started generating and nothing is charged. Run
tripo topupto open the billing page.
Backup sign-in and regions (only if browser sign-in is unavailable)
- If you already have an API key, run
tripo login --key tsk_..., or setTRIPO_API_KEYtogether withTRIPO_REGION(ovorcn) for that account; - An API key is an account credential: never paste it into chat, source code, screenshots, or logs;
tripo login --key tsk_...probes both regions and saves the accepted region automatically. SettingTRIPO_API_KEYdirectly does not perform that detection. Before browser authorization, select the site explicitly:ovfor international,cnfor China mainland;- In an AI agent or other non-interactive session without a key,
--regionis required. The CLI prints a verification URL and one-time code, then waits for a human to authorize. Ask which site the account uses before starting; do not infer it from language or sign-in method.
Windows / PowerShell
Commands on this page are shown as Bash. They also run on Windows; PowerShell just parses a few tokens differently from Bash or cURL. Use the examples below in PowerShell instead of copying the Bash blocks as-is.
Allow tripo to run
npm installs a tripo.ps1 shim that PowerShell blocks by default:
Set-ExecutionPolicy -Scope CurrentUser RemoteSigned
Reopen the terminal and run tripo doctor. Administrator rights are not required. Prefer not to change the policy? Use Command Prompt (cmd.exe) instead.
Quote @last and comma-separated flags
PowerShell treats @name as special syntax and , as a list separator:
tripo make "a cute low poly fox"
tripo view '@last'
tripo make hero.glb --then 'texture,rig'
tripo make '@last' --then 'convert:fbx'
Command Prompt does not need these extra quotes.
Environment variables
# Current window only
$env:TRIPO_API_KEY = "tsk_..."
$env:TRIPO_REGION = "ov"
$env:TRIPO_PROFILE = "work-ov"

# Persist for your Windows user
[System.Environment]::SetEnvironmentVariable("TRIPO_API_KEY", "tsk_...", "User")
[System.Environment]::SetEnvironmentVariable("TRIPO_REGION", "ov", "User")
Config and history live in %USERPROFILE%\.tripo (the Windows equivalent of ~/.tripo).
JSON pipelines
# PowerShell 7+ (recommended)
tripo make cat.png --json | tripo model texture --json | tripo anim rig --json

# Windows PowerShell 5.1
$json = tripo make cat.png --json --no-open
$json | tripo model texture --json
If a non-English prompt looks garbled, use Windows Terminal or run chcp 65001 first.
Create your first 3D model
Step 1: generate from one sentence
The words inside the quotation marks are your prompt—replace them with whatever you want to create:
tripo make "a cute low poly fox"
Keep the terminal open while the command runs. Tripo CLI picks the right workflow and model, waits for the task to finish, and downloads the files into a tripo-out folder in the current directory. The whole run usually finishes within a few minutes and costs a small amount of credits.
Trouble? Generation did not start, or failed midway
- Insufficient credits: your model has not started generating and nothing is charged. Run
tripo topupto add credits, then retry; - Network error or HTTP 5xx during submission: the task may already exist on the server. Check
tripo balancefor frozen credits and inspect the console before submitting again. If you have a task ID, resume withtripo task watch <task-id> --download; - Waiting timed out: the task may still be running and will be billed if it succeeds. Resume with
tripo task watch <task-id> --download; do not repeatmakeor useredoto recover a timeout; - Task failed: any charged credits are refunded automatically—try a different description.
Step 2: open the preview
tripo view @last
@last means “the most recent task.” Your browser opens an interactive 3D preview you can rotate by dragging—when you see your model, you made it! In PowerShell, write tripo view '@last'.
After the first success: what you have now
- Where the files are: a new folder under
tripo-outholds the downloaded 3D model andtask.json, which records how the task was created; if the server provides a preview image you also getpreview.png. - Open it again: run
tripo view @lastany time, ortripo view <file>to open any model file. - What it cost: run
tripo balanceto check your credit balance. - Hate memorizing commands? Just run
tripoto open a guided interactive menu—sign-in, generation, preview, and top-up all live there. - Next steps: generate from images (next section), let an AI assistant drive (“Let AI coding agents master the CLI”), or process in bulk (“Ready-made workflows and pipelines”).
Generate from an image or an existing model
Once the text example works, you can pass local files instead. concept.png, front.png, and hero.glb below are example names—replace them with your own file paths:
tripo make concept.png --for print
tripo make front.png back.png
tripo make hero.glb --then texture,rig
tripo make @last --then convert:fbx
- Line 1: turn a concept image into a print-ready model;
- Line 2: generate from front and back images together for more accurate detail;
- Line 3: texture and rig an existing model;
- Line 4: convert the most recent result to FBX.
Let AI coding agents master the CLI
If you use Codex, start with the Tripo 3D Codex plugin instead: you talk in plain language and do not run CLI commands yourself.
Skip this section if you do not use an AI coding agent. The npm package bundles an Agent Skill—command references, scenario recipes, and error-recovery guidance—so an agent can use the CLI correctly. Have the agent run these commands to print the full instructions or a single topic in the terminal:
tripo docs --llm
tripo docs --topic commands/make
tripo docs --topic examples/game-asset
Files bundled in the Skill
skill/
├── SKILL.md
├── common-errors.md
├── commands/
│   ├── account.md
│   ├── batch.md
│   ├── generate.md
│   ├── make.md
│   ├── process.md
│   ├── task.md
│   └── view.md
└── examples/
    ├── animation.md
    ├── ar-web.md
    ├── film.md
    ├── game-asset.md
    ├── pipes.md
    └── print.md
Command reference
No need to memorize this table: day to day, new users only need tripo (interactive menu), tripo make (generate), tripo view (preview), and tripo doctor (health check). Expand the rest only when a specific need comes up.
Show the full command table and common flags
| Command | What it does |
|---|---|
tripo make <input...> |
Generate, process, and download with one command |
tripo ai [description] |
Plan a job, confirm it, and execute it |
tripo view [task|file] |
Open an interactive local 3D preview |
tripo redo [task] |
Repeat a request with a fresh seed |
tripo login / logout / whoami / use |
Authorize and switch named account profiles |
tripo topup / balance / usage |
Open regional billing and inspect credits |
tripo generate <endpoint> |
Access all eight generation endpoints explicitly |
tripo model / anim / mesh <step> |
Run refine, texture, rig, convert, segmentation, and other processing steps |
tripo mesh decimate [input] |
Reduce polygon count; v3.0 can unwrap UVs in the same task |
tripo mesh uv [input] |
Unwrap UVs and remap existing textures, rig, and animation |
tripo task get/list/watch |
Query, list, or wait for tasks |
tripo history [--limit <n>] |
Show recent local task history |
tripo files upload <path> |
Upload a file and return its file_token |
tripo batch run <manifest.yaml> |
Run resumable bulk pipelines with concurrency and retries |
tripo config / doctor |
Manage settings and diagnose the local environment |
tripo update [--check] |
Install the latest CLI, or only check for an update |
tripo docs [--topic <topic>] |
Print the bundled Agent and command documentation |
tripo mcp |
Run the CLI as an MCP server |
tripo completion <shell> |
Generate completion for Bash, Zsh, or Fish (not PowerShell) |
The make, ai, and generate commands, plus the processing subcommands under model, anim, and mesh, support -o/--out, --no-wait, --no-download, --name, --timeout, --notify, and repeatable --param key=value. Global automation flags include --json, --yes, --quiet, --no-open, and --profile.
Ready-made workflows and pipelines
This is an advanced section; your first generation does not need it. Seven built-in presets apply useful parameters and processing steps at once via --for <preset>:
game-mobile · game-pc · film · print · ar-web · anim · toy
# Mobile game asset: low-poly generation, texture, then FBX
tripo make "sci-fi crate" --for game-mobile

# Print asset: watertight output, STL, and a flat bottom
tripo make "chess knight" --for print

# Explicit processing chain
tripo make cat.png --then texture,rig,convert:fbx

# The same chain as NDJSON pipes
tripo make cat.png --json | tripo model texture --json | tripo anim rig --json

# Resumable batch processing
tripo batch run assets.yaml --concurrency 2
Retopology and UV unwrapping
decimate still defaults to v2.0. Choose v3.0 for the newer retopology model; --smart-uv unwraps UVs in the same task and only supports v3.0 (omitting --model with this flag selects v3.0).
tripo mesh decimate hero.glb --model v3.0 --face-limit 5000 --smart-uv
tripo mesh uv hero.glb
The separate uv step remaps existing textures, rig, and animation onto the new UV layout and also returns a UV atlas. Its input must not exceed 80,000 equivalent triangles (one quad counts as two triangles). For larger models, decimate first, for example tripo make hero.glb --then decimate:20000,uv. In PowerShell, quote the chain as 'decimate:20000,uv'.
Task references such as @last, @2, and @name work anywhere a task ID is accepted.
Multiple accounts and regions
Skip this section if you use one Tripo account. Credentials are stored in named profiles, so signing into a second account does not overwrite the first:
tripo login --region ov --profile personal-ov
tripo login --region cn --profile work-cn
tripo use personal-ov
tripo whoami
tripo make "a fox" --profile personal-ov
tripo logout
Each profile keeps its own key and region. The TRIPO_PROFILE environment variable selects a profile for the current environment. TRIPO_API_KEY overrides the stored key, but does not automatically detect its region; set TRIPO_REGION to match the account when supplying a key through the environment.
Use the region that matches each account. tripo topup opens the active profile’s regional billing page: /billing on the international site or /billing/recharge on the China mainland site.
Notes for AI coding agents
Human users can skip this section. These rules help an AI coding agent wait for tasks correctly and read machine-readable output.
tripo makeandtripo task watchare blocking commands. Wait for the process to finish instead of implementing another polling loop.- With
--json, most one-shot commands write one final JSON line to stdout.tripo task watch --jsoninstead streams NDJSON progress events followed by the final result. - If
preview.pngexists, inspect it before deciding whether to continue a pipeline or runtripo redo. - Do not invent parameters or force legacy model versions. Use
tripo docs --topic ...for the supported flags. - A low-poly request or face budget of 20,000 or less selects
tripo-p1; other work defaults totripo-v3.1. tripo-p2is a Preview model and must be selected explicitly with--model tripo-p2. For quad low-poly output, add-p quad=true; quad output uses FBX, and P1 does not support quads. Use CLI model aliases; the CLI converts them to the dated model values expected by the API.- Inspect a plan without uploading, creating tasks, or spending credits with
tripo make "a low-poly robot" --model tripo-p2 --dry-run. - Task creation is automatically retried only for HTTP 429. A network error, timeout, or HTTP 5xx can leave the submission outcome uncertain; check the account before submitting again.
Show the exit-code table
| Exit code | Meaning |
|---|---|
0 |
Success |
1 |
Unexpected or internal error |
2 |
Invalid usage or parameters |
3 |
Authentication error |
4 |
Insufficient credits |
5 |
Content policy rejection |
6 |
Task failed (credits refunded), or waiting timed out (task may still run; resume watching) |
7 |
Network error |
8 |
Resource not found |
9 |
Rate limited; retry with backoff |
Environment variables for automation
You do not need environment variables for normal interactive use; they exist for CI, scripts, and advanced agent workflows. Remember: never commit an API key to a repository, paste it into documentation, or include it in screenshots or logs.
Anonymous usage analytics are enabled by default for the international official API, using a random installation ID. They record command outcomes and task metadata, including model/type, credits/duration, error category, output format/file count, and agent attribution; prompts, file paths, input assets, API keys, and download URLs are excluded. China mainland and custom API endpoints do not send these events. Set TRIPO_ANALYTICS_ENABLED=0 to opt out.
Show the environment-variable table
| Variable | Purpose |
|---|---|
TRIPO_API_KEY |
Overrides the stored key without detecting its region; pair with the correct TRIPO_REGION in scripts |
TRIPO_PROFILE |
Named account profile, equivalent to --profile |
TRIPO_REGION |
ov or cn override for API requests; does not replace login --region for non-interactive browser authorization |
TRIPO_API_BASE_URL |
API endpoint override |
TRIPO_PLATFORM_BASE_URL |
Platform endpoint override |
TRIPO_HOME |
Config and history directory; defaults to ~/.tripo |
TRIPO_NO_UPDATE_CHECK |
Any non-empty value (for example 1) disables automatic startup version checks |
TRIPO_NPM_REGISTRY |
Registry URL for CLI version queries; defaults to https://registry.npmjs.org. Installation uses the npm registry configuration |
HTTPS_PROXY / HTTP_PROXY / NO_PROXY |
Proxy URLs and bypass list for CLI network requests; lowercase names also work |
TRIPO_ANALYTICS_ENABLED |
Set exactly 0 to disable anonymous usage analytics; China mainland and custom API endpoints send none |
TRIPO_LLM_BASE_URL |
Optional OpenAI-compatible endpoint for tripo ai |
TRIPO_LLM_API_KEY |
Optional LLM key for tripo ai |
TRIPO_LLM_MODEL |
Optional LLM model for tripo ai |